
The Office 2007 Custom UI Editor is a great little utility that serves the following functions:
- Serves as an editor for your RibbonUI XML code.
- Allows you to validate your XML code. If there are errors, it will point you to the line of error.
- Enables you to insert icons or pictures for your controls.
- Generate callbacks
Orientation to the Editor
To start your project, you simply open a valid Office 2007 file. Most likely, you will have macros in your file. Therefore, make sure the files you work with have a "m" at the end, such as myfile.docm, myfile.xlsm, mytemplate.dotm, or mytemplate.xltm. You can simply open a blank document and use "Save As" to save a blank file with these extensions. Opening a valid file will automatically display the XML code in the Editor. If there is no customized code, you will see a blank editing area.
The image below right shows a macro-enabled Excel workbook called Book1.xlsm.
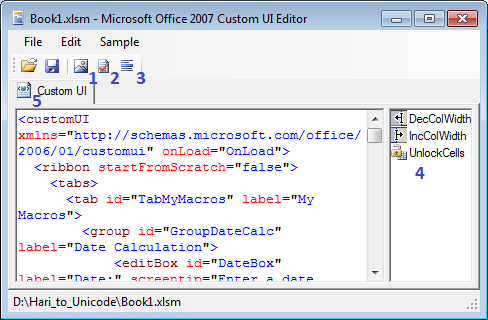
In the image, you can see the interface for the Editor. The following are the descriptions for the numbers icons/areas.
- This is the button to insert images. The images will show in area 4 once they are inserted. The images can be PNG or BMP. For transparency, I recommend PNG images.
- This is the button for code validation.
- This is the button for generating callbacks that you have used in your XML.
- This is the area where your images will show. Note that the extensions are omitted. When specifying an image to a control, the extension is omitted.
- This is the main editing area of your XML code.
Every now and then, after modifying your XML code, remember to click on the Validation button to ensure your code is well formed. If not, then you will have to determine what is wrong based on the error you get.
There is really nothing else to learn about the Editor. It is self-explanatory. It doesn't write the XML code for you. It just facilitates automatic access to the code so you can modify it directly rather than the manual method described earlier.
Let's now learn how to use callbacks to get those buttons functional.