
Assigning Macros to Buttons
The simplest control is the button, which basically executes a routine when clicked. The routine you probably want to execute with a button click is get a macro to run. There are two ways of accomplishing this task.
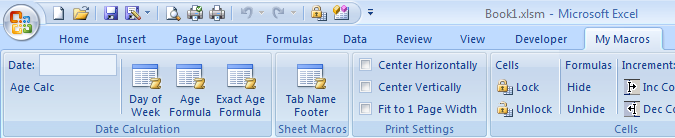
Take a look at the following partial code for an Excel document that creates the buttons "Day of Week", "Age Formula", and "Exact Age Formula" in a group called "Date Calculations" as shown in the image:
...
<button id="getDayofWeek" imageMso="PlayMacro" size="large" label="Day of Week" screentip="Day of Week Formula" getSupertip="getSupertip" onAction="RibbonXOnAction" tag="getDayofWeek" />
<button id="getAge" imageMso="PlayMacro" size="large" label="Age Formula"  screentip="Calculate Age from Date" getSupertip="getSupertip" onAction="RibbonXOnAction" tag="getAge" />
<button id="getExactAge" imageMso="PlayMacro" size="large" label="Exact Age Formula" screentip="Exact Age Formula" getSupertip="getSupertip" onAction="RibbonXOnAction" tag="getExactAge" />
...
Each of the buttons have 2 callbacks: getSupertip and onAction. Note that the callbacks are case-sensitive. The getSupertip callback basically tells the application that, in order to display the supertip for that button, it needs to run GetSupertip routine, which returns to Office the supertip for the control. The GetSupertip routine is compiled in the Visual Basic editor, which is launched from within Excel.
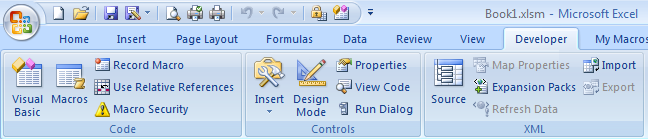
How to Run Visual Basic Editor. Enable the Developer tab in Excel by going to Excel options. In the popular category, click on "Show Developer tab...". Once the Developer tab shows in the Ribbon, you will see a button to launch Visual Basic editor.
Visual Basic Editor. The VB editor has the same interface and the same syntax is used for compiling the code for all Office applications. However, methods, objects, and properties vary from application to application because the applications are different. For example, in Word you type straight on the page of a document, whereas Excel uses discrete cells for data and PowerPoint uses individual slides. In order to determine the methods, objects, and properties, you may want to record macros and study the code.

Your "macros" or "procedures" are written in the VB editor. You can see my macros in a module called "myExcelMacros". First, you'll see some variables declared before your macros begin. Some of these variables are public and some are not. Public variables hold their value from one sub to another. Variables declared with Dim will be limited to that sub. You will learn later that the ByRef variables are the ones that do not need to be declared as public.
In the editing area, all of your macros start with Sub. The following sub is the one that assigns functionality to your button.
'Begin code that assigns RibbonX buttons a macro
Sub RibbonXOnAction(Button As IRibbonControl)
    RibbonID = Button.ID
    RibbonButton = Button.Tag
    Application.Run Button.Tag
End Sub
- Line 1: Comments begin with ' and are displayed green. You can include comments to help you remember what the macro does. They can be anywhere in the macro.
- Line 2: Remember that the onAction callback for the 3 buttons was the same: onAction="RibbonXOnAction". This line basically connects the XML code with the VBA code. Whatever you have set onAction to should match with the name of the Sub. In this example "RibbonXOnAction".
- Line 3: When you click one of the buttons, Excel knows which button was clicked. Since we know what button was clicked, I went ahead and assigned the ID of the button the variable RibbonID in case we need it later. Hence, if you click on "Day of Week" button, then RibbonID = "getDayOfWeek".
- Line 4: In the fourth line, the variable RibbonTag is assigned the value of Button.Tag, which has the same value as the ID for our buttons: RibbonTag = "getDayOfWeek". The tag field is just another field that you have at your disposal for various purposes. In this instance, I'm using the tag value to run the macro in line 3. I could have used the ID since it's the same as the tag.
- Line 5: The next line tells which macro to run. It calls the macro "getDayOfWeek" because the tag of this button is defined as "getDayOfWeek". We could have written Application.Run Button.ID since the values of ID and tag are the same.
This method involves one macro calling another macro instead of running it directly. The usefulness of this method will be noted later.
Now, we need to write what "getDayOfWeek" is going to do. I wrote this macro to insert the day of the week given the date. The date is in the cell to the left of the active cell (the selected cell). This macro is special in that it inserts the formula that will give me the day of week, not the value. So if the date changes, then the day will also change. Here is the Sub that writes the formula:
' Gets the day of week given any date.
Sub getDayofWeek()
    ActiveCell.FormulaR1C1 = "=TEXT(R[" & 0 & "]C[" & -1 & "],""dddd"")"
End Sub

In the image on the right, you can see the button in action. I took the screenshot on November 25, 2009, which was indeed a Wednesday prior to Thanksgiving. In the formula field, you can see that the macro inserted the formula =TEXT(B6,"dddd").
Note in the image the supertip when you hover over the button: "Inserts formula in selected cell to get...." I used a callback called getSupertip for these buttons. I will explain the second method of running macros by using the getSupertip callback example. It would seem the getSupertip is not "executing" a macro, but it is being executed by fetching the supertip. Your onAction callbacks can be written the same way to execute macros.
Note: The above example for getting a macro to run with a button is great when you have many macros written already, such as in a previous version of Microsoft Office. This method avoids you having to define a separate onAction callback for each macro and to rename all of your macros from Sub myMacro() to Sub myMacro(Button As IRibbonControl). All you need to do in your XML code is to identify the name of the macro with the tag field of the button: <button id="myButton" label="myLabel" onAction="RibbonXOnAction" tag="myMacroToRun" />. Since macro names cannot have spaces, you should not have any spaces in the tag field.